


You own the copyright for an image the instant you click the shutter, thanks to an international agreement called the Berne Convention[1], and it's recognized by 186 countries around the world. It states that the moment artwork is fixed in a tangible form
, copyright is automatic. But with the ubiquity of digital cameras these days, with every breath you take, over 100,000[2] new copyrighted photos are created world wide! How does anyone know which ones are yours? Keep reading.
Photos have become disposable these days… with many lasting only as long as the top 20 posts on a Facebook timeline remain visible. Some last longer… like Ansel Adams Moonrise, Herdandez, New Mexico
and Steve McCurry's Afghan Girl
. Some of yours will last longer too, and you may want to tag those photos, letting everyone know who took them and who owns the copyright. This article will explain half a dozen ways to do that.
 The easiest way to assert your copyright for a photo is to embed a short bit of text inside the same digital image file that contains the RGB image. The JPEG image file format provides for this and for other useful bits of information like the date of capture, camera model, exposure, lens, GPS coordinates, etc. These bits of information (also called
 metadata
) are invisible when the image is viewed from a web browser, and it's very easy for photographers who use DSLRs and/or Photoshop or Lightroom to tag photos in this way. The setup menu on your DSLR will have a way to enter text that will be inserted as a copyright tag into every picture taken with that camera[3].
If you use Photoshop (or Elements), the File / Info
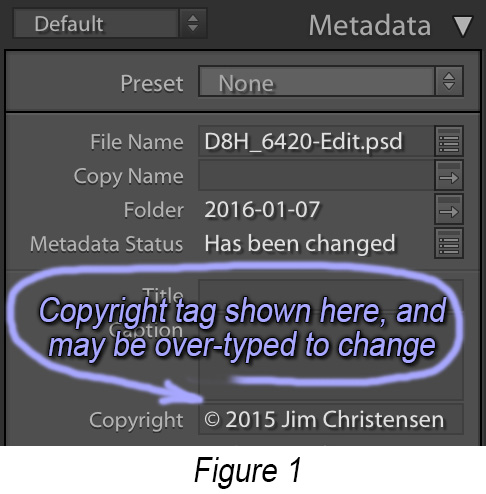
menu lets you examine, add, and change some of the the metadata tags (including the copyright). The Metadata
panel (Fig.1) on the right side of Lightroom's Library Module screen lets you do the same thing[4]. Also note that when you export images from Lightroom, the Metadata
panel (Fig.2)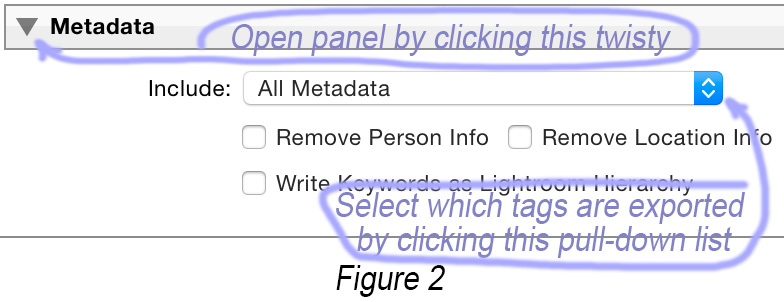 in the Export popup window lets you specify which which metadata tags to retain in the exported (generated) images. It's worth noting that you can fix the copyright on entire batches of images using either Photoshop (and a Photoshop
 action
) or Lightroom (by selecting multiple images and typing into the metadata panel)… it's not too late to set things right in images you've already captured without a copyright tag!
Unfortunately, metadata is easily removed from image files with freely available software. Want something more durable? Something you could take into a court of law? No problem, you can do it without ever leaving home. The US Copyright Office has an online website called eCO
at LinkTo:https://copyright.gov/registration/ that lets you register a batch[5] of images for as little as $35 (est). I found a nice step-by-step explanation of the eCO process at LinkTo:petapixel.com/2015/08/05/how-to-officially-register-your-photographs-with-the-us-copyright-office/ Please note that this process does not establish copyright.. that's automatic. This process just registers photos for which you already own the copyright, should you ever need to prove that a photo is yours. For most of us, that's more legal firepower than we're likely to need, but's it's easy and inexpensive… so if it gives you some peace of mind, go for it.
In addition to the above, you can annotate your photos with visible overlays, so-called visible watermarks
, using Photoshop (or Elements) and Lightroom. This comes in two flavors: simple text rendered with your choice of font, color, opacity. etc.; and graphic overlays that let you sign your photos in much the way that painters have signed their canvases for years. I'll describe both.
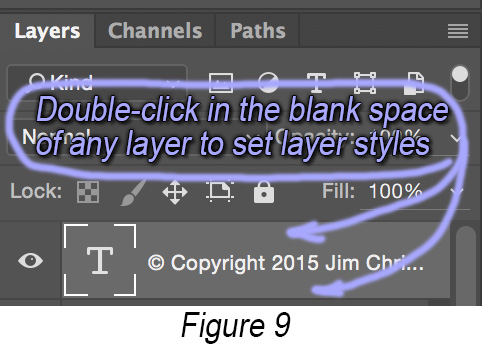
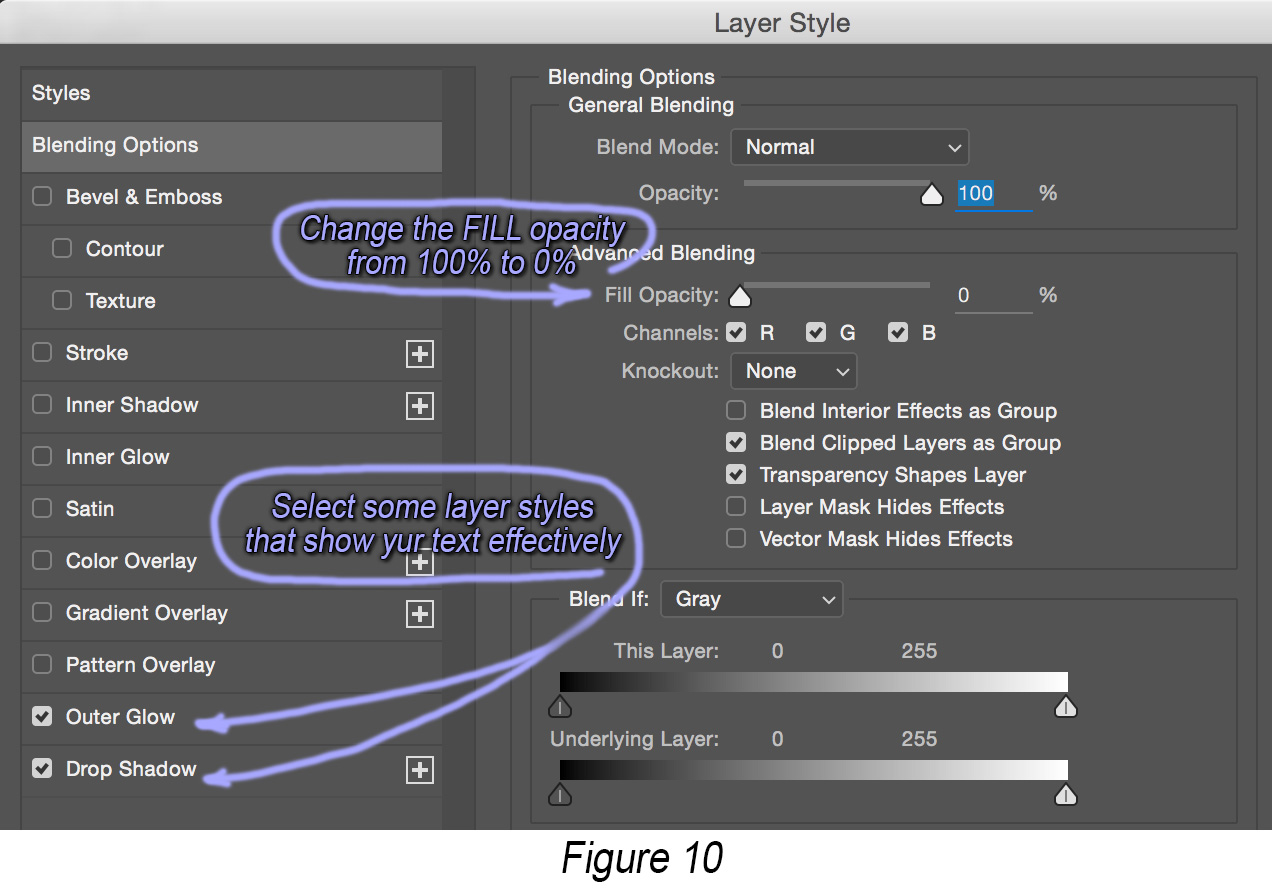
To create a text overlay in Photoshop (or Elements), select the type tool (Fig.3), then click and type anywhere in the image to create a new type layer (Fig.4). You can move the text using the move tool (Fig.5), and the lower the opacity (Fig.6) for a more subtle effect. You can change the text, font, and color by double-clicking the T icon on the type layer (Fig.7) and changing the parameters on the options bar (Fig.8). Nice-looking results can be achieved by double-clicking the blank area on the right side of the type layer (Fig.9), and then setting the fill level to zero and enabling layer styles such as outer glow and drop shadow in the layer styles popup window (Fig.10).


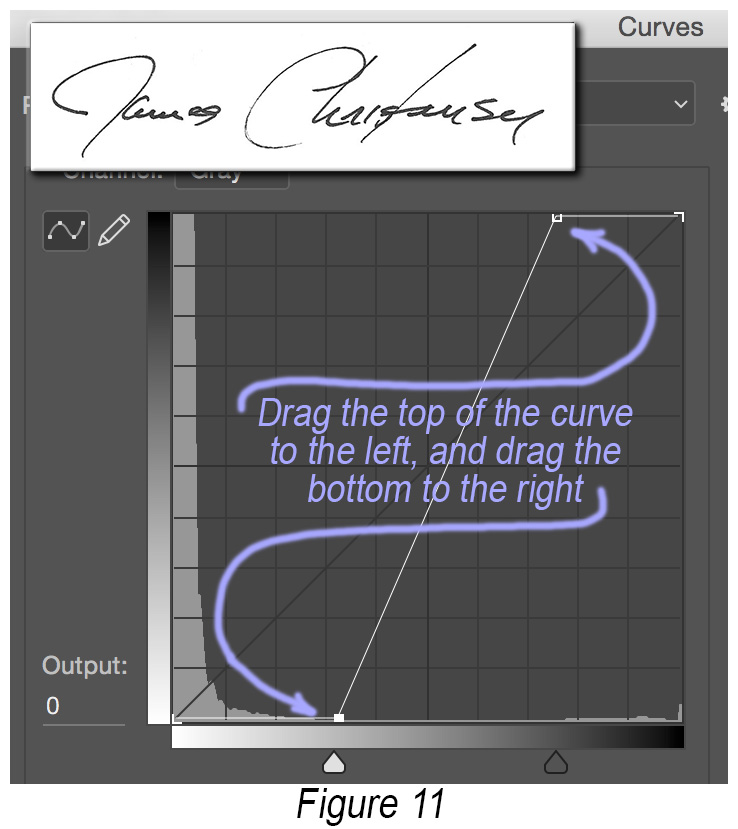
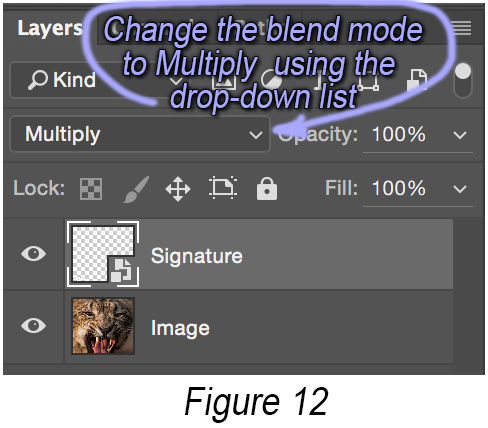
To sign your photos in your handwriting, first create a digital image of your signature by scanning your signature with a flatbed scanner. Crop your signature image in Photoshop, and adjust the relative brightness (using a curves or levels adjustment) so that the paper is as close to 100% pure white as possible, and the ink is as close to 100% pure black as possible (Fig.11). To sign a photo, add that signature image as a new layer using the Photoshop menu File / Place
. Size and move the new signature layer appropriately, then set the blend mode for that layer to multiply
(Fig.12). The result should look like you signed the digital image with a black pen (Fig.13).

Visible watermarks as described above effectively notify people that you own the image, but will not prevent them from removing the watermark by cropping or retouching. A more cunning approach is to use an invisible watermark. Remember writing with invisible ink (aka lemon juice) when you were a kid? When you heated the dried paper, the lemon juice darkened and you could see the writing that was invisible just seconds before. I was very impressed! Well there's a digital equivalent that does not require any citrus fruit. Advantages of invisible watermarks are:
- they are not obviously present, so not as likely to be removed by people trying to circumvent your copyright, and
- they can be centrally-placed (and replicated) in the image (since they are invisible), hence can't be removed by cropping the image at the edges.
The downside of invisible watermarks is they're harder to insert so they're invisible, durable, and detectable when you want to prove you own the image. They also come in three flavors:
- watermark can be inserted and detected by you using only the features in Photoshop
- watermark can be inserted and detected by purchasing 3rd-party software (from a vendor other than Adobe)
- watermark can be inserted and detected using the Digimarc plug-in (which is built right into Photoshop and Lightroom), but you have to by a yearly subscription from the Digimarc Corporation (which costs $49/year as of Feb.2016).
A detailed explanation of these techniques is an article in itself… in fact I wrote one that's on this website at LinkTo:Invisibe Watermarks
Oh, one last thing. Ever wonder if anyone is using your images without asking your permission? While there is no way to answer that question definitively, there are a couple of free websites that let you search the internet for one of your images using the image itself to guide the search. They are LinkTo:www.tineye.com/ and LinkTo:images.google.com/ I tried both using a recent selfie. TinEye found no matches in it's database of 14 billion images, explaining that TinEye looks for the specific image you uploaded, not the content of the image.
Google found several headshots of other people (none as… distinguished as yours truly!) who were photographed using a similar setup, including one Jörn Strojny who was not only a freelance photographer, but whose name suggests a common Nordic heritage… long ago when images were made with stones :-)
Sincerely yours,

[1] Established by an international convention in Berne Switzerland in 1886. The United States joined the convention on March 1, 1989.
[2] Estimate based on one trillion new photos per year, and an average adult respiration rate of 12 to 20 breaths per minute.
[3] Interesting that cell phones and point-and-shoot cameras lack this feature, and Google search turns-up no complaints about the missing feature.
[4] Note that Lightroom may store the changed metadata in it's internal catalog or in a so-called sidecar file
, and not embed it within the corresponding digital image file. Copies of the image exported from Lightroom will have the new metadata embedded, and you can force Lightroom to change the metadata inside the original image. Refer to the Lightroom help website for full details.
[5] The maximum number of images appears to be the number that can be uploaded in a compressed ZIP file within the 30-minute upload timeout period required by the eCO website…. sigh. In other words, a lot but the maximum number depends on factors (like network bandwidth and website traffic) beyond your control.